Kubernetes Cluster 에서 Cloud Provider 로 aws LoadBalancer 연결하기
kubernetes 에 서비스를 올릴 때 Service 의 Type 으로 LoadBalancer 를 선택하면 cloud 에서 자동으로 LB (external-ip ) 가 생성되어 서비스 pod 에 연결된다. 어떻게 Kubernetes 에서 설정한 값이 cloud 에 연결될까? 이는 Cloud Provider 가 있어 가능하다.
Cloud Provider 는 초기에 Kubernetes Controller 에 포함되어 있다. 하지만 지금은 External Kubernete Cloud Provider 로 Kubernetes 에서 제외되었으며, 이전 Kubernetes Controller 에 포함된 Cloud Provider 는 Legacy Cloud Provider 로 불리고 있다.
AWS Cloud Provider 의 경우에는 아직 1.23 (Kubernetes 와 같이 버전을 맞춰가고 있음) alpha 버전이라 아직은 Legacy Cloud Provider 를 사용하는 것이 안정적이다.
aws 에서는 아래의 순서대로 적용한다.
- IAM Policy, Role 생성
- VPC, Subnet, Routing Table, Internet Gateway, Nat Gateway 생성
- VM 생성
- aws resource 에 Tag 적용
- Kubernetes Cluster 생성
1. IAM Policy, Role 생성
Control plane 과 Node 2개의 Policy 를 생성한다.
Control Plane Policy
control node 에서 사용할 policy 이다.
정책명: control-plane.cluster-api-provider-aws.sigs.k8s.io
{
  "Version": "2012-10-17",
  "Statement": [
    {
      "Effect": "Allow",
      "Action": [
        "autoscaling:DescribeAutoScalingGroups",
        "autoscaling:DescribeLaunchConfigurations",
        "autoscaling:DescribeTags",
        "ec2:DescribeInstances",
        "ec2:DescribeRegions",
        "ec2:DescribeRouteTables",
        "ec2:DescribeSecurityGroups",
        "ec2:DescribeSubnets",
        "ec2:DescribeVolumes",
        "ec2:DescribeAvailabilityZones",
        "ec2:CreateSecurityGroup",
        "ec2:CreateTags",
        "ec2:CreateVolume",
        "ec2:ModifyInstanceAttribute",
        "ec2:ModifyVolume",
        "ec2:AttachVolume",
        "ec2:AuthorizeSecurityGroupIngress",
        "ec2:CreateRoute",
        "ec2:DeleteRoute",
        "ec2:DeleteSecurityGroup",
        "ec2:DeleteVolume",
        "ec2:DetachVolume",
        "ec2:RevokeSecurityGroupIngress",
        "ec2:DescribeVpcs",
        "elasticloadbalancing:AddTags",
        "elasticloadbalancing:AttachLoadBalancerToSubnets",
        "elasticloadbalancing:ApplySecurityGroupsToLoadBalancer",
        "elasticloadbalancing:CreateLoadBalancer",
        "elasticloadbalancing:CreateLoadBalancerPolicy",
        "elasticloadbalancing:CreateLoadBalancerListeners",
        "elasticloadbalancing:ConfigureHealthCheck",
        "elasticloadbalancing:DeleteLoadBalancer",
        "elasticloadbalancing:DeleteLoadBalancerListeners",
        "elasticloadbalancing:DescribeLoadBalancers",
        "elasticloadbalancing:DescribeLoadBalancerAttributes",
        "elasticloadbalancing:DetachLoadBalancerFromSubnets",
        "elasticloadbalancing:DeregisterInstancesFromLoadBalancer",
        "elasticloadbalancing:ModifyLoadBalancerAttributes",
        "elasticloadbalancing:RegisterInstancesWithLoadBalancer",
        "elasticloadbalancing:SetLoadBalancerPoliciesForBackendServer",
        "elasticloadbalancing:AddTags",
        "elasticloadbalancing:CreateListener",
        "elasticloadbalancing:CreateTargetGroup",
        "elasticloadbalancing:DeleteListener",
        "elasticloadbalancing:DeleteTargetGroup",
        "elasticloadbalancing:DescribeListeners",
        "elasticloadbalancing:DescribeLoadBalancerPolicies",
        "elasticloadbalancing:DescribeTargetGroups",
        "elasticloadbalancing:DescribeTargetHealth",
        "elasticloadbalancing:ModifyListener",
        "elasticloadbalancing:ModifyTargetGroup",
        "elasticloadbalancing:RegisterTargets",
        "elasticloadbalancing:DeregisterTargets",
        "elasticloadbalancing:SetLoadBalancerPoliciesOfListener",
        "iam:CreateServiceLinkedRole",
        "kms:DescribeKey"
      ],
      "Resource": [
        "*"
      ]
    }
  ]
}
Node Policy
일반 Node 에 대한 policy 이다.
정책명: nodes.cluster-api-provider-aws.sigs.k8s.io
{
  "Version": "2012-10-17",
  "Statement": [
    {
      "Effect": "Allow",
      "Action": [
        "ec2:DescribeInstances",
        "ec2:DescribeRegions",
        "ecr:GetAuthorizationToken",
        "ecr:BatchCheckLayerAvailability",
        "ecr:GetDownloadUrlForLayer",
        "ecr:GetRepositoryPolicy",
        "ecr:DescribeRepositories",
        "ecr:ListImages",
        "ecr:BatchGetImage"
      ],
      "Resource": "*"
    }
  ]
}
policy 를 생성했으면 이제 Role 을 생성한다.
Control plane Role
Policy 를 활용할 수 있는 Role 을 만들어서 Policy 와 연결한다.
Role 명: control-plane.cluster-api-provider-aws.sigs.k8s.io
연결할 Policy 리스트
- control-plane.cluster-api-provider-aws.sigs.k8s.io
- nodes.cluster-api-provider-aws.sigs.k8s.io
Node Role
Role 명: nodes.cluster-api-provider-aws.sigs.k8s.io
연결할 Policy 리스트
- nodes.cluster-api-provider-aws.sigs.k8s.io
2. VPC, Subnet, Routing Table, Internet Gateway, Nat Gateway 생성
서울 리전의 경우 VPC 를 1개 만들고, public 용도의 subnet 4개, private 용도의 subnet 4개를 만든다.
Internet Gateway 1개를 만들어서 public subnet 에 연결하고, Nat Gateway 4개를 만들어서 각각 private subnet 에 연결한다.
Routing Table 은 subnet 갯수에 맞는 8개를 만들어서 각각 연결한다. private 용 4개의 Routing table 은 0.0.0.0/0 → nat gateway 를 대상으로 설정하고, public 용 4개의 Routing table 은 0.0.0.0/0 → internet gateway 대상으로 설정한다.
1. vpc : 1개
   - vpc

2. subent : 8개
   - public-subnet-a
   - public-subnet-b
   - public-subnet-c
   - public-subnet-d
   - private-subnet-a
   - private-subnet-b
   - private-subnet-c
   - private-subnet-d

3. internat gateway : 1개
   - igw

4. Nat Gateway : 4개
   - nat-private-a
   - nat-private-b
   - nat-private-c
   - nat-private-d

5. Routing Table : 4개
   - rt-public-a (0.0.0.0/0 -> igw)
   - rt-public-b (0.0.0.0/0 -> igw)
   - rt-public-c (0.0.0.0/0 -> igw)
   - rt-public-d (0.0.0.0/0 -> igw)
   - rt-priabe-a (0.0.0.0/0 -> nat-private-a)
   - rt-priabe-b (0.0.0.0/0 -> nat-private-b)
   - rt-priabe-c (0.0.0.0/0 -> nat-private-c)
   - rt-priabe-d (0.0.0.0/0 -> nat-private-d)
3. VM 생성
VM 은 Controler Plane 3대는 각 private subnet 에 1대씩 생성하고(subnet 1개는 남는다), Node 용 4대는 각 private subnet 1대씩 생성하다.
bastion 노드로 public subnet 에 1대 생성한다.
1. bastion VM 1대
   - public-subnet-a

2. Control Plane VM 3대
   - private-subnet-a
   - private-subnet-b
   - private-subnet-c

3. Node VM 4대
   - private-subnet-a
   - private-subnet-b
   - private-subnet-c
   - private-subnet-d
4. Aws Resource 에 Tag 설정
aws cloud provider 가 리소스를 파악하기 위해서는 aws 에 적절한 값을 설정해야 한다.
4-1. VM 에 IAM Role 을 할당
VM 에서 권한을 얻기 위해서는 반드시 IAM Role 을 할당해야 한다.
Control node 에는 control-plane.cluster-api-provider-aws.sigs.k8s.io role 을 할당한다.

일반 Node 에는 nodes.cluster-api-provider-aws.sigs.k8s.io role 을 할당한다.

4-2 VM 에 Tag 설정
VM 에는 Kubernetes Cluster Name 을 Tag 로 지정한다. kubernetes.io/cluster/<cluster name> 과 같이 지정하는데 Cluster Name 은 Kubernetes 를 설치할 때 지정할 수 있다. 기본 값은 cluster.local 인데 여기서는 ahnsk 로 이름을 지정하였다.
그리고 vm 의 역할을 지정해야 하는데 Controler Node 는 control-plane 으로, Node 는 node 로 지정한다.


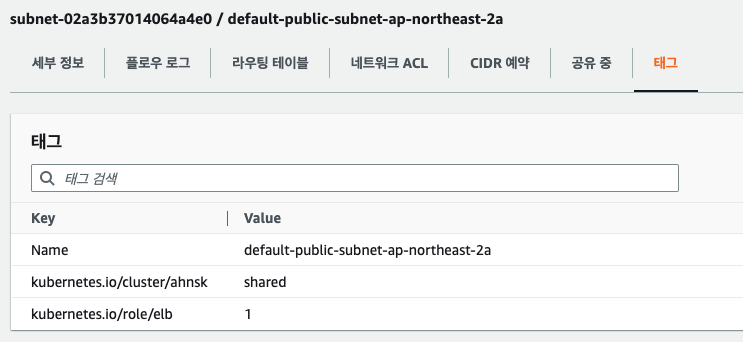
4-3. Subnet 에 Tag 설정
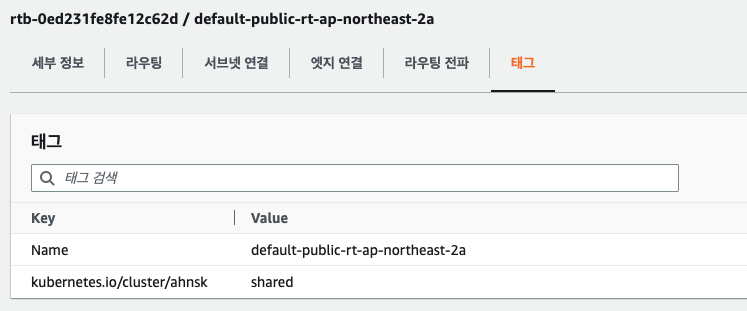
Load Balancer 를 핸들링 하기 위해서 Kubernetes Cluster 가 어느 Subnet 과 Routing Table 을 사용해야 하는지 알아야 한다.
주의해야 할 점은 public subnet 의 경우 [kubernetes.io/role/elb](http://kubernetes.io/role/elb) 이지만, private subnet 의 경우에는 [kubernetes.io/role/internal-elb](http://kubernetes.io/role/internal-elb) 로 해야 한다.

4-4. Routing Table 에 Tag 설정

5. Kubernetes Cluster 생성
Kubernetes cluster 이름은 앞에서 설명했듯이 ahnsk 로 설정한다.
kubeadm 혹은 kubespray 를 사용할 수 있으며 여기서 생성 방법을 생략한다.
aws cloud provider 를 활성화 하기 위해서는 API Server, Controller, Kubelet 에 --cloud-provider=aws 옵션을 추가해야 한다.
kube-apiserver.yaml
apiVersion: v1
kind: Pod
metadata:
  annotations:
    kubeadm.kubernetes.io/kube-apiserver.advertise-address.endpoint: 172.31.22.52:6443
  creationTimestamp: null
  labels:
    component: kube-apiserver
    tier: control-plane
  name: kube-apiserver
  namespace: kube-system
spec:
  containers:
  - command:
    - kube-apiserver
    - --advertise-address=172.31.22.52
...
    **- --cloud-provider=aws**
...
    image: registry.k8s.io/kube-apiserver:v1.24.6
...
kube-controller-manager.yaml
apiVersion: v1
kind: Pod
metadata:
  creationTimestamp: null
  labels:
    component: kube-controller-manager
    tier: control-plane
  name: kube-controller-manager
  namespace: kube-system
spec:
  containers:
  - command:
    - kube-controller-manager
    - --allocate-node-cidrs=true
...
    **- --cloud-provider=aws
...**
    image: registry.k8s.io/kube-controller-manager:v1.24.6
...
kubelet.env
...
KUBELET_CLOUDPROVIDER="**--cloud-provider=aws --cloud-config=/etc/kubernetes/cloud_config**"
...
kubelet 은 aws 의 리소스를 위해 추가해야 할 값들이 있는데 cloud_config 을 만들어서 옵션을 전달하였다.
[Global]
zone=
vpc=vpc-b342d5d8
subnetId=
routeTableId=
roleArn=
kubernetesClusterTag=ahnsk
kubernetesClusterId=ahnsk
disableSecurityGroupIngress=false
disableStrictZoneCheck=false
elbSecurityGroup=
값을 다 채워 넣으면 apiserver 가 kube-apiserver-master-dummy 라는 이름으로 잘못 실행되므로 조심해야 한다. master-dummy 로 띄우는 방법은 aws account 가 다를 경우에만 사용하는 방법이다. 이는 아래 소스를 보면 알 수 있다.
https://github.com/kubernetes/legacy-cloud-providers/blob/707ecda639b086132369678680a1b34d4d2b5c7c/aws/aws.go#L1251

...
  tagged := cfg.Global.KubernetesClusterTag != "" || cfg.Global.KubernetesClusterID != ""
    if cfg.Global.VPC != "" && (cfg.Global.SubnetID != "" || cfg.Global.RoleARN != "") && tagged {
        // When the master is running on a different AWS account, cloud provider or on-premise
        // build up a dummy instance and use the VPC from the nodes account
        klog.Info("Master is configured to run on a different AWS account, different cloud provider or on-premises")
        awsCloud.selfAWSInstance = &awsInstance{
            nodeName: "master-dummy",
            vpcID:    cfg.Global.VPC,
            subnetID: cfg.Global.SubnetID,
        }
        awsCloud.vpcID = cfg.Global.VPC
    } else {
        selfAWSInstance, err := awsCloud.buildSelfAWSInstance()
        if err != nil {
            return nil, err
        }
        awsCloud.selfAWSInstance = selfAWSInstance
        awsCloud.vpcID = selfAWSInstance.vpcID
    }
...
RoleARN 의 값을 넣으면 안되는데 값이 없으면서도 어떻게 kubelet 이 해당 Role 로 인증을 받을 수 있을까? 이는 앞에서 설명한 VM 에 IAM Role 인 control-plane.cluster-api-provider-aws.sigs.k8s.io 이나 nodes.cluster-api-provider-aws.sigs.k8s.io 이 설정되어 있기 때문에 가능하다.
kubelet-config.yaml
kubernetes node 정보에 providerID 값이 들어가 있어야 한다. 만약 이 정보가 없다면 LoadBalancer 가 생성된다고 하더라도 인스턴스가 LoadBalancer 에 할당되지 않아 제대로 사용할 수 가 없다.
providerID 는 kubelet-config.yaml 에 추가한다. aws:///<zone-id>/<instance-id> 값으로 추가한다.
$ sudo vi /etc/kubernetes/kubelet-config.yaml
...
providerID: "aws:///ap-northeast-2d/i-0f59f059e2d64213f"
...
이미 노드가 생성된 경우에는 해당 값을 변경하고 kubelet 서비스를 다시 restart 한다고 값이 추가되지는 않는다. 그래서 patch 명령으로 동적으로 추가하는 것이 좋다.
$ kubectl patch node ip-172-31-46-179.ap-northeast-2.compute.internal -p '{"spec": {"providerID": "aws:///ap-northeast-2d/i-08cb6f884239f894c"}}'5. Nginx 로 테스트
nginx 를 생성하고 service 를 LoadBalancer type 으로 생성하여 잘 접속이 되는지 확인해 보자.
$ kubectl create deploy nginx --image=nginx
deployment.apps/nginx created
$ kubectl get pods
NAME READY STATUS RESTARTS AGE
nginx-8f458dc5b-nhkfd 1/1 Running 0 55s$ kubectl expose deployment nginx --name nginx-svc --target-port=80 --port=80 --type=LoadBalancer$ kubectl get svc
NAME TYPE CLUSTER-IP EXTERNAL-IP PORT(S) AGE
kubernetes ClusterIP 10.233.0.1 <none> 443/TCP 5h28m
nginx-svc LoadBalancer 10.233.7.131 a76a315f5d7c14652a4db83cc3b25125-113127685.ap-northeast-2.elb.amazonaws.com 80:30796/TCP 27s