반응형
2024년 행사 Recap

반응형
쿠버네티스 코리아 디스코드 채널 주소 입니다.
kubernetes-korea Discord 서버에 가입하세요!
Discord에서 kubernetes-korea 커뮤니티를 확인하세요. 395명과 어울리며 무료 음성 및 텍스트 채팅을 즐기세요.
discord.com
$ sudo adduser ask

$ cat <<EOF | sudo tee /etc/sudoers.d/sudoers-ask
ask     ALL=(ALL:ALL)   NOPASSWD:ALL
EOF

$ sudo systemctl stop ufw
$ sudo systemctl disable ufw
$ sudo systemctl stop apparmor.service
$ sudo systemctl disable apparmor.service
$ sudo swapoff -a
$ cat <<EOF | sudo tee /etc/modules-load.d/k8s.conf
overlay
br_netfilter
EOF

$ sudo modprobe overlay
$ sudo modprobe br_netfilter
$ cat <<EOF | sudo tee /etc/sysctl.d/99-kubernetes.conf
net.bridge.bridge-nf-call-iptables  = 1
net.bridge.bridge-nf-call-ip6tables = 1
net.ipv4.ip_forward                 = 1
EOF


$ sudo sysctl --system
$ sudo iptables -P FORWARD ACCEPT
$ sudo apt-get update
$ sudo apt-get install -y apt-transport-https ca-certificates curl gpg
$ sudo install -m 0755 -d /etc/apt/keyrings
$ sudo curl -fsSL https://download.docker.com/linux/ubuntu/gpg -o /etc/apt/keyrings/docker.asc
$ sudo chmod a+r /etc/apt/keyrings/docker.asc

$ echo \
  "deb [arch=$(dpkg --print-architecture) signed-by=/etc/apt/keyrings/docker.asc] https://download.docker.com/linux/ubuntu \
  $(. /etc/os-release && echo "$VERSION_CODENAME") stable" | \
  sudo tee /etc/apt/sources.list.d/docker.list > /dev/null

$ sudo apt-get update
$ sudo apt-get install -y containerd.io

$ sudo mkdir -p /etc/containerd
$ sudo containerd config default | sudo tee /etc/containerd/config.toml

$ sudo sed -i 's/SystemdCgroup \= false/SystemdCgroup \= true/g' /etc/containerd/config.toml

$ sudo systemctl restart containerd
$ sudo systemctl enable containerd
$ sudo systemctl status containerd
#----------------------------------------------------------
# 서버가 arm64 or amd64 인지 확인하여 설치
#----------------------------------------------------------
$ VERSION="v1.30.0"
$ curl -L https://github.com/kubernetes-sigs/cri-tools/releases/download/$VERSION/crictl-${VERSION}-linux-arm64.tar.gz --output crictl-${VERSION}-linux-arm64.tar.gz

$ sudo tar zxvf crictl-$VERSION-linux-arm64.tar.gz -C /usr/local/bin
$ rm -f crictl-$VERSION-linux-arm64.tar.gz

#----------------------------------------------------------
# crictl 이 어느 container 를 접속할 것인지 세팅
#----------------------------------------------------------
$ cat <<EOF | sudo tee /etc/crictl.yaml
runtime-endpoint: unix:///run/containerd/containerd.sock
image-endpoint: unix:///run/containerd/containerd.sock
timeout: 2
debug: false
pull-image-on-create: false
EOF

$ sudo bash -c "crictl completion > /etc/bash_completion.d/crictl"
$ source ~/.bashrc


#----------------------------------------------------------
# containerd 설정 확인
#----------------------------------------------------------
$ sudo crictl info
#----------------------------------------------------------
# 서버가 arm64 or amd64 인지 확인하여 설치
#----------------------------------------------------------
$ curl -LO "https://dl.k8s.io/release/v1.30.0/bin/linux/arm64/kubectl"
$ chmod +x ./kubectl
$ sudo mv ./kubectl /usr/local/bin/kubectl
$ mkdir -p ~/kubeadm && cd ~/kubeadm

#-----------------------------------------------
# kubernetes 다운로드 key 와 url 등록
#-----------------------------------------------
$ curl -fsSL https://pkgs.k8s.io/core:/stable:/v1.30/deb/Release.key | sudo gpg --dearmor -o /etc/apt/keyrings/kubernetes-apt-keyring.gpg

$ echo 'deb [signed-by=/etc/apt/keyrings/kubernetes-apt-keyring.gpg] https://pkgs.k8s.io/core:/stable:/v1.30/deb/ /' | sudo tee /etc/apt/sources.list.d/kubernetes.list
$ sudo apt-get update


#========================================================================
# kubelet 설치 (아직 kubelet 이 뜨지는 않음)
#========================================================================
$ sudo apt-get install -y kubelet="1.30.3-*" kubeadm="1.30.3-*"
$ sudo systemctl enable --now kubelet
$ sudo systemctl start kubelet

#========================================================================
# 1. kubeadm 설치
#========================================================================
$ sudo kubeadm config images pull

#------------------------------------------------------------
# 자기 노드의 ip: --apiserver-advertise-address
# multi control-plane 일 경우 L4 ip: --control-plane-endpoint
# cgroup driver 세팅 (https://kubernetes.io/docs/tasks/administer-cluster/kubeadm/configure-cgroup-driver/)
#------------------------------------------------------------
$ vi kubeadm-config.yaml

apiVersion: kubeadm.k8s.io/v1beta3
kind: InitConfiguration
nodeRegistration:
  criSocket: "/var/run/containerd/containerd.sock"

---
apiVersion: kubeadm.k8s.io/v1beta3
kind: ClusterConfiguration
apiServer:
  certSANs:
  - 127.0.0.1
  - localhost
  - <Node private IP>
  - <Node public IP>
networking:
  serviceSubnet: 10.233.0.0/18
  podSubnet: 10.233.64.0/18
  dnsDomain: "cluster.local"


#----------------------------------------------------------------
# kubeadm init 을 하고 나면 /var/lib/kubelet/config.yaml 이 생성되어
# kubelet 이 정상적으로 실행됨
#----------------------------------------------------------------
$ sudo kubeadm init --config kubeadm-config.yaml --v=5


#------------------------------------------------------------
# kubeconfig
#------------------------------------------------------------
$ mkdir -p ~/.kube
$ sudo cp -i /etc/kubernetes/admin.conf $HOME/.kube/config
$ sudo chown $(id -u):$(id -g) $HOME/.kube/config
$ mkdir -p ~/calico && cd ~/calico

$ curl -LO https://raw.githubusercontent.com/projectcalico/calico/v3.28.0/manifests/tigera-operator.yaml

$ kubectl create -f tigera-operator.yaml

$ curl -LO https://raw.githubusercontent.com/projectcalico/calico/v3.28.0/manifests/custom-resources.yaml

#------------------------------------------------------------
# yaml 을 열어서 pod 네트워크를 확인하고 변경
#------------------------------------------------------------
$ vi custom-resources.yaml
...
    cidr: 10.233.64.0/18
...

$ kubectl create -f custom-resources.yaml

#------------------------------------------------------------
# calico 설치 확인
#------------------------------------------------------------
$ kubectl get pods -n calico-system
$ source <(kubectl completion bash)
$ kubectl completion bash > ~/.kube/completion.bash.inc

$ printf "
# kubectl shell completion
source '$HOME/.kube/completion.bash.inc'
" >> $HOME/.bash_aliases

$ source $HOME/.bash_aliases
$ kubectl taint nodes --all node-role.kubernetes.io/control-plane-
$ mkdir -p ~/sample-yaml && cd ~/sample-yaml

$ cat <<EOF | tee ./nginx-service.yaml
apiVersion: apps/v1
kind: Deployment
metadata:
  labels:
    app: nginx-deployment
  name: nginx-deployment
spec:
  replicas: 1
  selector:
    matchLabels:
      app: nginx
  template:
    metadata:
      labels:
        app: nginx
    spec:
      containers:
      - name: nginx
        image: nginx:1.21.0
        ports:
        - containerPort: 80

---
apiVersion: v1
kind: Service
metadata:
  name: nginx-service-nodeport
spec:
  selector:
    app: nginx
  ports:
  - protocol: TCP
    port: 8080
    targetPort: 80
    nodePort: 30180
  type: NodePort
  externalTrafficPolicy: Local
EOF


$ kubectl apply -f nginx-service.yaml

$ kubectl get pods

$ curl <Node ip>:30180minkube 설치는 아래 사이트를 참고한다.
https://minikube.sigs.k8s.io/docs/start/
$ curl -LO <https://storage.googleapis.com/minikube/releases/latest/minikube-darwin-arm64>
$ install minikube-darwin-arm64 /Users/ask/bin/minikube
https://minikube.sigs.k8s.io/docs/drivers/docker/
driver 를 docker 로 사용하기 때문에 docker 를 미리 설치해 놓아야 한다.
$ docker context use default
이후에 minikube 로 cluster 를 생성한다.
$ minikube start --driver=docker --memory=4096
--- output ---
😄  Darwin 13.5.2 (arm64) 의 minikube v1.33.0
✨  유저 환경 설정 정보에 기반하여 docker 드라이버를 사용하는 중
📌  Using Docker Desktop driver with root privileges
👍  Starting "minikube" primary control-plane node in "minikube" cluster
🚜  Pulling base image v0.0.43 ...
🔥  Creating docker container (CPUs=2, Memory=4096MB) ...
❗  This container is having trouble accessing <https://registry.k8s.io>
💡  To pull new external images, you may need to configure a proxy: <https://minikube.sigs.k8s.io/docs/reference/networking/proxy/>
🐳  쿠버네티스 v1.30.0 을 Docker 26.0.1 런타임으로 설치하는 중
    ▪ 인증서 및 키를 생성하는 중 ...
    ▪ 컨트롤 플레인을 부팅하는 중 ...
    ▪ RBAC 규칙을 구성하는 중 ...
🔗  bridge CNI (Container Networking Interface) 를 구성하는 중 ...
🔎  Kubernetes 구성 요소를 확인...
    ▪ Using image gcr.io/k8s-minikube/storage-provisioner:v5
🌟  애드온 활성화 : storage-provisioner, default-storageclass

❗  /Users/ask/bin/kubectl is version 1.28.2, which may have incompatibilities with Kubernetes 1.30.0.
    ▪ Want kubectl v1.30.0? Try 'minikube kubectl -- get pods -A'
🏄  끝났습니다! kubectl이 "minikube" 클러스터와 "default" 네임스페이스를 기본적으로 사용하도록 구성되었습니다.
디폴트 메모리를 config 에 세팅할 수 도 있다.
config 세팅은 기존에 만든 minikube node 에는 적용이 안되고 새롭게 만드는 노드에만 적용된다.
$ minikube config set memory 4096
minikube 에 worker node 를 추가할 수 있다.
$ minikube node add
node 가 추가된 것을 볼 수 있다.
$ kubectl get nodes
NAME           STATUS   ROLES           AGE     VERSION
minikube       Ready    control-plane   8m22s   v1.30.0
minikube-m02   Ready    <none>          86s     v1.30.0
node 에 Role 을 추가하고 싶으면 다음과 같이 지정한다.
$ kubectl label node minikube-m02 node-role.kubernetes.io/node=enabled --overwrite

$ kubectl get nodes
NAME           STATUS   ROLES           AGE     VERSION
minikube       Ready    control-plane   15m     v1.30.0
minikube-m02   Ready    node            8m12s   v1.30.0
$ minkube status
--- output ---
minikube
type: Control Plane
host: Running
kubelet: Running
apiserver: Running
kubeconfig: Configured

minikube-m02
type: Worker
host: Running
kubelet: Running
$ minkube pause -A
--- output --
⏸️  Pausing node minikube ...
⏸️  Pausing node m02 ...
⏯️  Paused 16 containers
$ minikube unpause -A
--- output ---
⏸️  Unpausing node minikube ...
⏸️  Unpausing node m02 ...
⏸️  Unpaused 16 containers
$ minikube stop --all=true
--- output ---
✋  "minikube-m02" 노드를 중지하는 중 ...
🛑  "minikube-m02"를 SSH로 전원을 끕니다 ...
✋  "minikube" 노드를 중지하는 중 ...
🛑  "minikube"를 SSH로 전원을 끕니다 ...
🛑  2개의 노드가 중지되었습니다.
$ minikube start -p aged --kubernetes-version=v1.28.2
minikube delete --all
$ minikube addons list
|-----------------------------|----------|--------------|--------------------------------|
|         ADDON NAME          | PROFILE  |    STATUS    |           MAINTAINER           |
|-----------------------------|----------|--------------|--------------------------------|
| ambassador                  | minikube | disabled     | 3rd party (Ambassador)         |
| auto-pause                  | minikube | disabled     | minikube                       |
| cloud-spanner               | minikube | disabled     | Google                         |
| csi-hostpath-driver         | minikube | disabled     | Kubernetes                     |
| dashboard                   | minikube | disabled     | Kubernetes                     |
| default-storageclass        | minikube | enabled ✅   | Kubernetes                     |
| efk                         | minikube | disabled     | 3rd party (Elastic)            |
| freshpod                    | minikube | disabled     | Google                         |
| gcp-auth                    | minikube | disabled     | Google                         |
| gvisor                      | minikube | disabled     | minikube                       |
| headlamp                    | minikube | disabled     | 3rd party (kinvolk.io)         |
| helm-tiller                 | minikube | disabled     | 3rd party (Helm)               |
| inaccel                     | minikube | disabled     | 3rd party (InAccel             |
|                             |          |              | [info@inaccel.com])            |
| ingress                     | minikube | disabled     | Kubernetes                     |
| ingress-dns                 | minikube | disabled     | minikube                       |
| inspektor-gadget            | minikube | disabled     | 3rd party                      |
|                             |          |              | (inspektor-gadget.io)          |
| istio                       | minikube | disabled     | 3rd party (Istio)              |
| istio-provisioner           | minikube | disabled     | 3rd party (Istio)              |
| kong                        | minikube | disabled     | 3rd party (Kong HQ)            |
| kubeflow                    | minikube | disabled     | 3rd party                      |
| kubevirt                    | minikube | disabled     | 3rd party (KubeVirt)           |
| logviewer                   | minikube | disabled     | 3rd party (unknown)            |
| metallb                     | minikube | disabled     | 3rd party (MetalLB)            |
| metrics-server              | minikube | disabled     | Kubernetes                     |
| nvidia-device-plugin        | minikube | disabled     | 3rd party (NVIDIA)             |
| nvidia-driver-installer     | minikube | disabled     | 3rd party (Nvidia)             |
| nvidia-gpu-device-plugin    | minikube | disabled     | 3rd party (Nvidia)             |
| olm                         | minikube | disabled     | 3rd party (Operator Framework) |
| pod-security-policy         | minikube | disabled     | 3rd party (unknown)            |
| portainer                   | minikube | disabled     | 3rd party (Portainer.io)       |
| registry                    | minikube | disabled     | minikube                       |
| registry-aliases            | minikube | disabled     | 3rd party (unknown)            |
| registry-creds              | minikube | disabled     | 3rd party (UPMC Enterprises)   |
| storage-provisioner         | minikube | enabled ✅   | minikube                       |
| storage-provisioner-gluster | minikube | disabled     | 3rd party (Gluster)            |
| storage-provisioner-rancher | minikube | disabled     | 3rd party (Rancher)            |
| volumesnapshots             | minikube | disabled     | Kubernetes                     |
| yakd                        | minikube | disabled     | 3rd party (marcnuri.com)       |
|-----------------------------|----------|--------------|--------------------------------|
$ minikube addons enable dashboard
--- output ---
💡  dashboard is an addon maintained by Kubernetes. For any concerns contact minikube on GitHub.
You can view the list of minikube maintainers at: <https://github.com/kubernetes/minikube/blob/master/OWNERS>
    ▪ Using image docker.io/kubernetesui/dashboard:v2.7.0
    ▪ Using image docker.io/kubernetesui/metrics-scraper:v1.0.8
💡  Some dashboard features require the metrics-server addon. To enable all features please run:

	minikube addons enable metrics-server

🌟  'dashboard' 애드온이 활성화되었습니다
$ minikube addons enable metrics-server
--- output ---
💡  metrics-server is an addon maintained by Kubernetes. For any concerns contact minikube on GitHub.
You can view the list of minikube maintainers at: <https://github.com/kubernetes/minikube/blob/master/OWNERS>
    ▪ Using image registry.k8s.io/metrics-server/metrics-server:v0.7.1
🌟  'metrics-server' 애드온이 활성화되었습니다
$ minikube dashboard --url
minikube 를 설치하고 pod 가 생성안되는 가장 큰 이유는 proxy 때문이다. 회사에서 proxy 를 사용한다면 proxy 세팅을 추가로 해줘야 한다.
아래 내용은 proxy 이외의 문제일 때 해결 방법이다.
Error response from daemon: Get "<https://registry-1.docker.io/v2/>": tls: failed to verify certificate: x509: certificate signed by unknown authority
minikube 의 docker-env 를 확인한 후 세팅한다.
$ minikube -p minikube docker-env
--- output ---
export DOCKER_TLS_VERIFY="1"
export DOCKER_HOST="tcp://127.0.0.1:53131"
export DOCKER_CERT_PATH="/Users/ask/.minikube/certs"
export MINIKUBE_ACTIVE_DOCKERD="minikube"

$ docker context create minikube --description "Minikube" --docker "host=tcp://localhost:53131,ca=/Users/ask/.minikube/certs/ca.pem,cert=/Users/ask/.minikube/certs/cert.pem,key=/Users/ask/.minikube/certs/key.pem"
$ docker context use minikube
위의 경우에는 minikube 를 띄울 때 --insecure-registry 를 추가한다.
$ minikube start --insecure-registry="registry-1.docker.io"
아니면 minikube 로 노드에 접속해서 docker 에 인증서를 추가한다.
$ minikube ssh
$ sudo su -

$ update-ca-certificates --fresh
$ openssl s_client -showcerts -verify 5 -connect k8s.gcr.io:443 < /dev/null 2>/dev/null | openssl x509 -outform PEM | tee ~/k8s.gcr.io.crt
$ openssl s_client -showcerts -verify 5 -connect registry-1.docker.io:443 < /dev/null 2>/dev/null | openssl x509 -outform PEM | tee ~/registry-1.docker.io.crt
$ openssl s_client -showcerts -verify 5 -connect auth.docker.io:443 < /dev/null 2>/dev/null | openssl x509 -outform PEM | tee ~/auth.docker.io.crt
$ cp ~/k8s.gcr.io.crt /usr/local/share/ca-certificates/
$ cp ~/registry-1.docker.io.crt /usr/local/share/ca-certificates/
$ cp ~/auth.docker.io.crt /usr/local/share/ca-certificates/
$ update-ca-certificates

$ systemctl restart docker
kind 는 아래 설치 사이트를 참조한다.
https://kind.sigs.k8s.io/docs/user/quick-start/
$ [ $(uname -m) = arm64 ] && curl -Lo ./kind <https://kind.sigs.k8s.io/dl/v0.22.0/kind-darwin-arm64>
$ chmod +x kind
$ mv kind ~/bin/kind
image 는 아래 사이트에서 확인 가능하다.
https://github.com/kubernetes-sigs/kind/releases
kind config 는 여기를 참조한다.
https://kind.sigs.k8s.io/docs/user/quick-start/#configuring-your-kind-cluster
ingress 를 사용하기 위해서는 아래 내용 처럼 port mapping 을 해야 한다.
https://kind.sigs.k8s.io/docs/user/ingress
$ vi kind-config.yaml
kind: Cluster
apiVersion: kind.x-k8s.io/v1alpha4
# patch the generated kubeadm config with some extra settings
kubeadmConfigPatches:
- |
  apiVersion: kubelet.config.k8s.io/v1beta1
  kind: KubeletConfiguration
  evictionHard:
    nodefs.available: "0%"
# patch it further using a JSON 6902 patch
kubeadmConfigPatchesJSON6902:
- group: kubeadm.k8s.io
  version: v1beta3
  kind: ClusterConfiguration
  patch: |
    - op: add
      path: /apiServer/certSANs/-
      value: my-hostname
nodes:
- role: control-plane
  image: kindest/node:v1.29.2@sha256:51a1434a5397193442f0be2a297b488b6c919ce8a3931be0ce822606ea5ca245
#  extraPortMappings:
#  - containerPort: 80
#    hostPort: 10080
#    listenAddress: "0.0.0.0" # Optional, defaults to "0.0.0.0"
#    protocol: tcp # Optional, defaults to tcp
- role: worker
  image: kindest/node:v1.29.2@sha256:51a1434a5397193442f0be2a297b488b6c919ce8a3931be0ce822606ea5ca245
#featureGates:
#  FeatureGateName: true
$ KIND_EXPERIMENTAL_PROVIDER=docker && kind create cluster --name kind --config kind-config.yaml
--- output ---
Creating cluster "kind" ...
 ✓ Ensuring node image (kindest/node:v1.29.2) 🖼
 ✓ Preparing nodes 📦 📦
 ✓ Writing configuration 📜
 ✓ Starting control-plane 🕹️
 ✓ Installing CNI 🔌
 ✓ Installing StorageClass 💾
 ✓ Joining worker nodes 🚜
Set kubectl context to "kind-kind"
You can now use your cluster with:

kubectl cluster-info --context kind-kind

Thanks for using kind! 😊
$ kind get clusters
$ kubectl cluster-info --context kind-kind
$ kind delete cluster --name kind
스터디에서 준비해야 할 내용 리스트
Kubernetes 를 세미나를 하거나 모임에서 만나면 쿠버네티스를 알고 싶어 하시는 분들이 제일 문제 물어보는 것이 있다.
"쿠버네티스를 잘 모르는데 이제부터 공부하고 싶어요. 어떤거 부터 하면 좋을까요?"
그 동안은 이는 리눅스를 무엇부터 공부해야 할까요? 와 거의 비슷한 이야기인거 같다. 그래서 키워드로 스스로 공부할 수 있도록 키워드로 리스트를 만들었다.
$ curl -L -o opa <https://github.com/open-policy-agent/opa/releases/download/v0.62.1/opa_darwin_arm64_static>
$ chmod +x opa
$ mv opa ~/bin/
참고로 홈 디렉토리 아래의 bin 디렉토리에 실행 패스가 잡혀있기 때문에 해당 디렉토리로 이동시킨 것이다.
JetBrain 의 IntelliJ 가 있다면 Open Policy Agent 플러그인을 설치하여 rego 프로그램을 작성할 수 있다.
hello 프로그램을 작성하여 실행하여 보자.
먼저 번들용 chap1 디렉토리를 만든다.
$ mkdir -p chap1chap1 번들 아래에 hello.rego 파일을 만든다.
package hello

default allow_hello = false
default allow_world = false

allow_hello {
    "hello" != ""
}

allow_world {
    "world" != "world"
}
패키지 hello 는 디렉토리와 상관없으며 chap1 디렉토리를 만들었기 때문에 bundle 은 chap1 이다.
allow_hello 와 allow_world 는 rule 을 나타낸다. OPA 1.0 미만은 if 문이 없기 때문에 비교문 만으로 표현한다. OPA 1.0 부터는 if 문을 사용한다.
opa 실행은 input json 에 대한 output json 이 결과로 나오는데 input 소스를 보면 input 이 필요없기 때문에 빈 input.json 파일을 만든다.
$ touch input.json 현재까지의 디렉토리 구조를 보면 다음과 같다.
rego-example.iml 은 IntelliJ 의 OPA 플러그인에서 사용하는 파일이므로 신경쓸 필요가 없다.
$ tree .
.
├── chap1
│   ├── hello.rego
│   └── input.json
└── rego-example.iml
이를 cli 로 실행하면 다음과 같다.
$ opa eval -f pretty -b chap1 data.hello

--- output ---
{
  "allow_hello": true,
  "allow_world": false
}
opa eval 명령어로 rule 을 평가할 수 있다.
-f pretty 결과를 보기 쉽게 출력하라는 의미이다.
-b cha1 은 Bundle 을 입력해야 하는데 chap1 디렉토리 의 아래 rego 파일을 실행하다.
data.hello 는 Query 를 의미하며, 여기에는 package 나 rule 을 넣으면 된다. data 는 명시적으로 붙혀서 data.패키지 로 입력하면 된다.
allow_hello rule 을 실행하기 위해서는 query 부분에 rule 까지 넣어주면 된다.
$ opa eval -f pretty -b chap1 data.hello.allow_hello

--- output ---
true
결과 값으로 json 형태가 디퐅트로 출력되는데 -f pretty 를 제거하면 json 으로 결과가 출력된다.
$ opa eval -b chap1 data.hello

--- output ---
{
  "result": [
    {
      "expressions": [
        {
          "value": {
            "allow_hello": true,
            "allow_world": false
          },
          "text": "data.hello",
          "location": {
            "row": 1,
            "col": 1
          }
        }
      ]
    }
  ]
}
input 을 위해서 빈 input.json 파일을 만들었는데 이를 활용하는 명령을 추가할 수 있다.
input 값을 실제로 사용하지는 않기 때문에 결과 값은 동일하다.
$ opa eval -b chap1 -i chap1/input.json data.hello

--- output ---
{
  "result": [
    {
      "expressions": [
        {
          "value": {
            "allow_hello": true,
            "allow_world": false
          },
          "text": "data.hello",
          "location": {
            "row": 1,
            "col": 1
          }
        }
      ]
    }
  ]
}
실행을 cli 로 하지 말고 IntelliJ 에서 실행하는 방법은 아래와 같이 입력하면 된다.
메뉴에서 Run >> Edit Configurations... 을 실행한다.
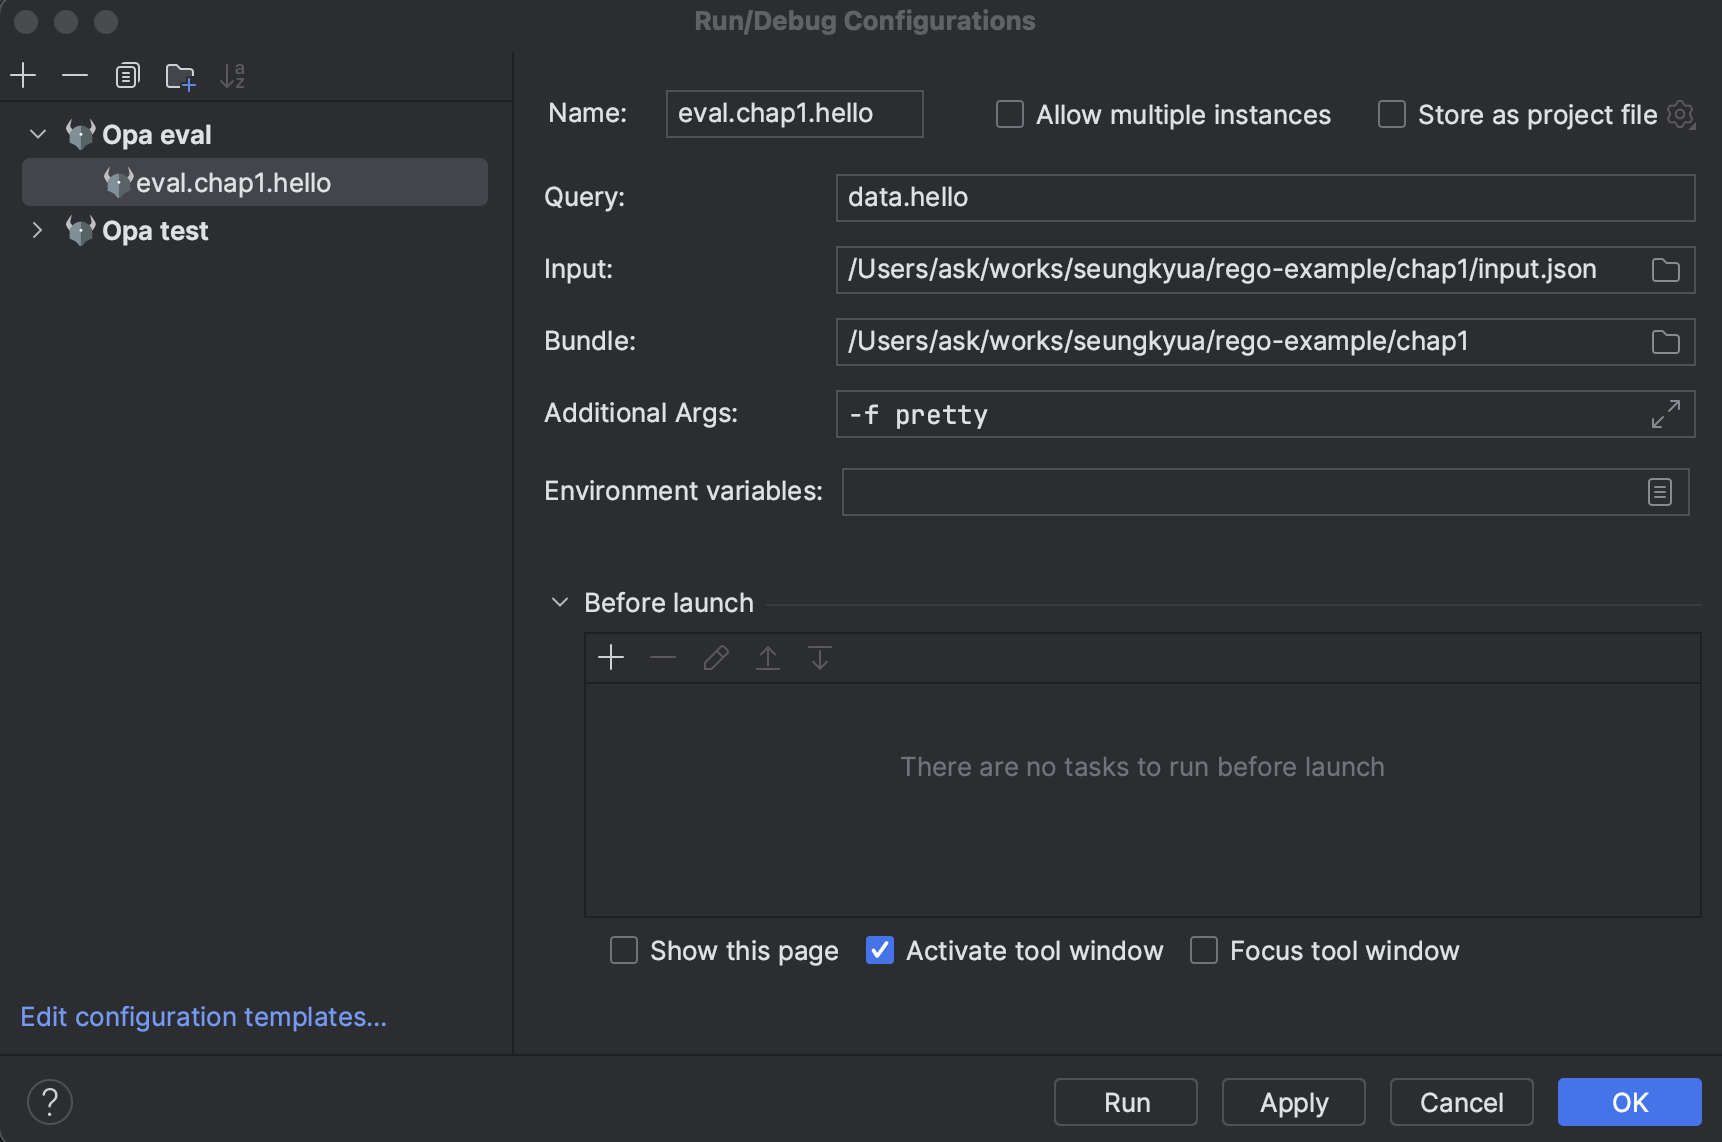
앞에서 설명한 cli 에서 입력한 내용을 그대로 넣으면 된다.
Run 버튼을 클릭하면 다음과 같이 결과가 나온다.

소스는 아래 사이트에서 다운받을 수 있다. (계속 업데이트 될 예정)
인터페이스가 다른 인터페이서를 가지는 임베딩 방식을 사용하여 인터페이스를 선언할 수 있다. 예를 들어 io.ReadCloser 인터페이스는 io.Reader 와 io.Closer 인터페이스를 가지고 있다.
type Reader interface {
        Read(p []byte) (n int, err error)
}

type Closer interface {
        Close() error
}

type ReadCloser interface {
        Reader
        Closer
}
이 경우 ReadCloser 인터페이스는 아래와 동일 효과를 갖는다.
type ReadCloser interface {
        Read(p []byte) (n int, err error)
        Close() error
}
그런데 인터페이스를 struct 타입 안에 임베딩할 수 도 있다.
이렇게 struct 타입 안에 인터페이스를 넣는 이유는 보통 Stub 으로 유닛 테스트 코드를 만들기 쉽기 때문이다.
아래와 같이 Calculator 라는 스트럭트가 있다고 하자.
type Calculator struct {
    Resolver MathResolver
}
여기에는 MathResolver 인터페이스 타입의 필드를 가지고 있다.
type MathResolver interface {
    Resolve(expression string) (float64, error)
}
이렇게 인터페이스를 만들어 놓으면 MathResolver 를 Stub 으로 구현하여 테스트 코드를 만들 수 있다.
Calculator 는 계산 표현식을 가지고 실제 계산하여 결과 값을 리턴하는 Process 라는 메소스도 가진다.
func (c Calculator) Process(r io.Reader) (float64, error) {
    expression, err := readOneLine(r)
    if err != nil {
        return 0, err
    }
    if len(expression) == 0 {
        return 0, errors.New("no expression to read")
    }
    answer, err := c.Resolver.Resolve(expression)
    return answer, err
}
readOneLine 함수는 계산 표현식을 한 줄만 읽어들이는 함수이며, 이렇게 읽어들인 함수를 MathResolver 타입의 Resolve 함수에 아규먼트로 넘겨서 결과를 받아오는 구조이다.
이제 Proecess 메소드에 대한 테스트 코드를 만들어 보자.
첫번째로 테스트 코드로 MathResolverStub 스트럭트와 Resolve 메소드를 간단히 구현한다.
type MathResolverStub struct{}

func (mr MathResolverStub) Resolve(expr string) (float64, error) {
    switch expr {
    case "2 + 4 * 10":
        return 42, nil
    case "( 2 + 4 ) * 10":
        return 60, nil
    case "( 2 + 4 * 10":
        return 0, fmt.Errorf("invalid expression: %s", expr)
    }
    return 0, nil
}
다음으로 이 스텁을 사용한 테스트 코드를 작성한다.
func TestCalculatorProcess(t *testing.T) {
    c := embed.Calculator{Resolver: MathResolverStub{}}
    in := strings.NewReader(`2 + 4 * 10
( 2 + 4 ) * 10
( 2 + 4 * 10`)

    data := []float64{42, 60, 0}
    expectedErr := errors.New("invalid expression: ( 2 + 4 * 10")
    for _, d := range data {
        result, err := c.Process(in)
        if err != nil {
            if err.Error() != expectedErr.Error() {
                t.Errorf("want (%v) got (%v)", expectedErr, err)
            }
        }
        if result != d {
            t.Errorf("Expected result %f, got %f", d, result)
        }
    }
}
MathResolverStub 를 가지는 Calculator 를 생성하여 Calculator 의 Process 메소드를 테스트할 수 있는 코드를 쉽게 작성할 수 있다.
테스트 코드의 전체 작성은 다음과 같다.
$ mkdir -p interface/embed
$ vi interface/embed/calculate.go

package embed

import (
    "errors"
    "io"
)

type Calculator struct {
    Resolver MathResolver
}

type MathResolver interface {
    Resolve(expression string) (float64, error)
}

func (c Calculator) Process(r io.Reader) (float64, error) {
    expression, err := readOneLine(r)
    if err != nil {
        return 0, err
    }
    if len(expression) == 0 {
        return 0, errors.New("no expression to read")
    }
    answer, err := c.Resolver.Resolve(expression)
    return answer, err
}

func readOneLine(r io.Reader) (string, error) {
    var out []byte
    b := make([]byte, 1)
    for {
        _, err := r.Read(b)
        if err != nil {
            if err == io.EOF {
                return string(out), nil
            }
        }
        if b[0] == '\n' {
            break
        }
        out = append(out, b[0])
    }
    return string(out), nil
}
$ vi interface/embed/calculate_test.go
package embed_test
import (
"errors"
"fmt"
"strings"
"testing"
"github.com/seungkyua/go-test/interface/embed"
)
type MathResolverStub struct{}
func (mr MathResolverStub) Resolve(expr string) (float64, error) {
switch expr {
case "2 + 4 * 10":
return 42, nil
case "( 2 + 4 ) * 10":
return 60, nil
case "( 2 + 4 * 10":
return 0, fmt.Errorf("invalid expression: %s", expr)
}
return 0, nil
}
func TestCalculatorProcess(t *testing.T) {
c := embed.Calculator{Resolver: MathResolverStub{}}
in := strings.NewReader(`2 + 4 * 10
( 2 + 4 ) * 10
( 2 + 4 * 10`)
data := []float64{42, 60, 0}
expectedErr := errors.New("invalid expression: ( 2 + 4 * 10")
for _, d := range data {
result, err := c.Process(in)
if err != nil {
if err.Error() != expectedErr.Error() {
t.Errorf("want (%v) got (%v)", expectedErr, err)
}
}
if result != d {
t.Errorf("Expected result %f, got %f", d, result)
}
}
}
실행을 위한 세팅 명령어는 다음과 같다.
$ go mod init github.com/seungkyua/go-test
$ go mod tidy
$ go mod vendor

$ go work init
$ go work use .
go work 는 비지니스 모듈 패키지를 아직 github 에 커밋하지 않은 상태에서 로컬의 최신 패키지 참조를 위해서 필요하다.
전체 소스 트리는 다음과 같다.
$ tree .
.
├── README.md
├── go.mod
├── go.work
└── interface
    └── embed
        ├── calculate.go
        └── calculate_test.go
다음은 테스트 실행 결과이다.
$ go test interface/embed/calculate_test.go
ok      command-line-arguments  0.390s
소스는 아래의 링크에서 다운 받을 수 있다.
Git 을 사용하다 보면 저장소에 작업한 commit 을 원복해야 하는 경우가 종종 발생한다. 로컬에서 혼자서 작업한다면 reset 을 사용해서 이전 commit 으로 쉽게 돌릴 수 있지만 이미 원격 저장소에 push 한 상태라면 revert 를 사용하여 이전 commit 을 취소하는 새로운 commit 을 만들어야 한다.
명료하게 아래 2가지 경우만 생각하면 된다.
아직 원격 저장소에 push 하지 않은 경우 : reset 사용
원격 저장소에 push 한 경우 : revert 사용
예외적으로 원격 저장소에 push 한 경우라도 reset 을 사용해서 commit 을 돌릴 수 있다. 하지만 이 때는 원격의 commit 도 같이 삭제하는 작업이 필요하므로 git push 를 할 때 -f 으로 강제 push 를 해야하는 문제가 있어 여러명이 함께 작업하는 경우라면 다른 사람들에게 문제가 발생할 수 있다. (웬만하면 하지 말아야 한다)
아래와 같은 commit log 가 있다고 보자.
$ git log --oneline -n 5

4e61ca5 (HEAD -> main, origin/main, origin/HEAD) add c.txt
3bd328a add b.txt
be0d36b add a.txt
205a70c Initial commit
$ ls -l
total 8
-rw-r--r--@ 1 ask staff 17 3 14 10:12 README.md
-rw-r--r--@ 1 ask staff 0 3 14 10:15 a.txt
-rw-r--r--@ 1 ask staff 0 3 14 10:16 b.txt
-rw-r--r--@ 1 ask staff 0 3 14 10:17 c.txtInitial 커밋에는 README.md 파일이 추가되어 있고, 이후 각 커밋은 a.txt, b.txt, c.txt 가 추가되어 있는 상태이다. 여기서 a.txt 만 남기고 b.txt, c.txt 를 지운 상태의 돌아가고 싶다고 하면 a.txt 를 추가한 be0d36b add a.txt 커밋 상태로 돌아가면 된다.
$ git reset --hard be0d36b
HEAD is now at be0d36b add a.txt로그와 파일을 조회해 보면 정상적으로 commit 이 이전 상태로 돌아온 것을 알 수 있다.
$ git log --oneline -n 5
be0d36b (HEAD -> main) add a.txt
205a70c Initial commit$ ls -l
total 8
-rw-r--r--@ 1 ask staff 17 3 14 10:12 README.md
-rw-r--r--@ 1 ask staff 0 3 14 10:15 a.txtreset 명령을 수행하면 커밋이 이전 상태로 돌아간 것이기 때문에 다시 원상태로 돌릴려면 원격 저장소에서 다시 pull 로 가져오면 된다.
$ git pull
Updating be0d36b..4e61ca5
Fast-forward
b.txt | 0
c.txt | 0
2 files changed, 0 insertions(+), 0 deletions(-)
create mode 100644 b.txt
create mode 100644 c.txt$ git log --oneline -n 5
4e61ca5 (HEAD -> main, origin/main, origin/HEAD) add c.txt
3bd328a add b.txt
be0d36b add a.txt
205a70c Initial commit파일도 원상태로 생성된 것을 알 수 있다.
$ ls -l
total 8
-rw-r--r--@ 1 ask  staff  17  3 14 10:12 README.md
-rw-r--r--@ 1 ask  staff   0  3 14 10:15 a.txt
-rw-r--r--@ 1 ask  staff   0  3 14 10:16 b.txt
-rw-r--r--@ 1 ask staff 0 3 14 10:17 c.txt현재 커밋 로그는 다음과 같습니다.
$ git log --oneline -n 5
4e61ca5 (HEAD -> main, origin/main, origin/HEAD) add c.txt
3bd328a add b.txt
be0d36b add a.txt
205a70c Initial commit여기서 3bd328a add b.txt 을 삭제하고 싶을 때 revert 를 할 수 있다.
$ git revert 3bd328a --no-edit
[main 5a9e9f1] Revert "add b.txt"
Date: Thu Mar 14 10:51:58 2024 +0900
1 file changed, 0 insertions(+), 0 deletions(-)
delete mode 100644 b.txtgit log 를 보면 다음과 같다.
$ git log --oneline -n 5
5a9e9f1 (HEAD -> main) Revert "add b.txt"
4e61ca5 (origin/main, origin/HEAD) add c.txt
3bd328a add b.txt
be0d36b add a.txt
205a70c Initial commit5a9e9f1 (HEAD -> main) Revert "add b.txt" 커밋 로그를 보면 revert 하면서 새로운 commit 이 생긴 것을 알 수 있다. reset 과는 다르게 commit 의 순서와 내용은 그대로 살아있으면서 revert 가 추가된 것이기 협업할 때 아무런 문제가 없다.
리스트를 보면 b.txt 가 삭제되어 다음과 같다.
$ ls -l
total 8
-rw-r--r--@ 1 ask  staff  17  3 14 10:12 README.md
-rw-r--r--@ 1 ask  staff   0  3 14 10:15 a.txt
-rw-r--r--@ 1 ask staff 0 3 14 10:38 c.txtrevert 와 reset 은 둘 다 파라미터로 commit hash 값을 넣는 것은 동일하나 동작되는 의미는 다르다. reset 은 해당 commit 으로 돌아가기 때문에 그 이후의 commit 은 없어지는 반면에 revert 는 해당 commit 만 제거하는 의미가 있다.
revert 하여 b.txt 를 삭제한 commit 은 5a9e9f1 (HEAD -> main) Revert "add b.txt" 이다. 이 commit 을 revert 하면 다시 b.txt 파일이 살아날 수 있다. revert 할 때 commit hash 값과 이를 가리키는 HEAD 도 같은 의미이기 때문에 HEAD 를 이용하여 revert 해보자.
$ git revert HEAD --no-edit

[main d2b2258] Revert "Revert "add b.txt""
 Date: Thu Mar 14 11:00:28 2024 +0900
 1 file changed, 0 insertions(+), 0 deletions(-)
 create mode 100644 b.txt
$ git log --oneline -n 10
d2b2258 (HEAD -> main) Revert "Revert "add b.txt""
5a9e9f1 Revert "add b.txt"
4e61ca5 (origin/main, origin/HEAD) add c.txt
3bd328a add b.txt
be0d36b add a.txt
205a70c Initial commit
$ ls -l
total 8
-rw-r--r--@ 1 ask staff 17 3 14 10:12 README.md
-rw-r--r--@ 1 ask staff 0 3 14 10:15 a.txt
-rw-r--r--@ 1 ask staff 0 3 14 11:00 b.txt
-rw-r--r--@ 1 ask staff 0 3 14 10:38 c.txtcommit hash 값을 나열하면 여러 commit 을 revert 할 수 있다.
3bd328a add b.txt 커밋과 4e61ca5 (origin/main, origin/HEAD) add c.txt 커밋을 동시에 revert 해보자.
$ git revert --no-edit be0d36b 4e61ca5

[main 3b6ada1] Revert "add a.txt"
 Date: Thu Mar 14 11:11:07 2024 +0900
 1 file changed, 0 insertions(+), 0 deletions(-)
 delete mode 100644 a.txt
[main bd91431] Revert "add c.txt"
 Date: Thu Mar 14 11:11:07 2024 +0900
 1 file changed, 0 insertions(+), 0 deletions(-)
 delete mode 100644 c.txt
$ git log --oneline -n 20
bd91431 (HEAD -> main) Revert "add c.txt"
3b6ada1 Revert "add a.txt"
d2b2258 Revert "Revert "add b.txt""
5a9e9f1 Revert "add b.txt"
4e61ca5 (origin/main, origin/HEAD) add c.txt
3bd328a add b.txt
be0d36b add a.txt
205a70c Initial commitrevert 가 잘 되었지만 각각의 revert 에 대한 커밋이 2개 추가되었다. 3b6ada1 Revert "add a.txt" , bd91431 (HEAD -> main) Revert "add c.txt"
앞에서 작업한 2개의 revert commit 을 원상태로 되돌려 보자. 원격으로 push 하지 않았으므로 reset 을 사용해도 문제가 없다.
여기서는 d2b2258 Revert "Revert "add b.txt"" 커밋으로 돌아가면 된다.
$ git reset --hard d2b2258
HEAD is now at d2b2258 Revert "Revert "add b.txt""

$ git log --oneline -n 20
d2b2258 (HEAD -> main) Revert "Revert "add b.txt""
5a9e9f1 Revert "add b.txt"
4e61ca5 (origin/main, origin/HEAD) add c.txt
3bd328a add b.txt
be0d36b add a.txt
205a70c Initial commit

$ ls -l
total 8
-rw-r--r--@ 1 ask  staff  17  3 14 10:12 README.md
-rw-r--r--@ 1 ask  staff   0  3 14 11:19 a.txt
-rw-r--r--@ 1 ask  staff   0  3 14 11:00 b.txt
-rw-r--r--@ 1 ask  staff   0  3 14 11:19 c.txt
revert -n 옵션을 사용하면 revert 할 때 index 는 사용하지만 commit 을 하지 않은 상태가 된다. 그러므로 git revert --continue 로 commit 을 진행하면 된다.
$ git revert -n be0d36b 4e61ca5현재 상태를 보면 index 에 저장된 상태임을 알 수 있다.
$ git status

On branch main
Your branch is ahead of 'origin/main' by 2 commits.
  (use "git push" to publish your local commits)

You are currently reverting commit 4e61ca5.
  (all conflicts fixed: run "git revert --continue")
  (use "git revert --skip" to skip this patch)
  (use "git revert --abort" to cancel the revert operation)

Changes to be committed:
  (use "git restore --staged <file>..." to unstage)
    deleted:    a.txt
    deleted:    c.txt
이제 commit 을 하면서 커밋 메세지를 추가할 수 있다.
$ git revert --continue메세지는 다음과 같이 입력했다.
Revert "add c.txt"
Revert "add a.txt"
git log 를 보면 커밋은 a4b6156 (HEAD -> main) Revert "add c.txt" Revert "add a.txt" 하나만 생성되었음을 알 수 있다.
$ git log --oneline -n 20

a4b6156 (HEAD -> main) Revert "add c.txt" Revert "add a.txt"
d2b2258 Revert "Revert "add b.txt""
5a9e9f1 Revert "add b.txt"
4e61ca5 (origin/main, origin/HEAD) add c.txt
3bd328a add b.txt
be0d36b add a.txt
205a70c Initial commit

$ ls -l
total 8
-rw-r--r--@ 1 ask  staff  17  3 14 10:12 README.md
-rw-r--r--@ 1 ask  staff   0  3 14 11:00 b.txt
다음 설명을 위해서 다시 reset 을 하자. commit 하나만 뒤로가면 되므로 HEAD^1 을 사용해도 된다.
$ git reset --hard HEAD^1현재 커밋 로그는 다음과 같다.
$ git log --oneline -n 20

d2b2258 (HEAD -> main) Revert "Revert "add b.txt""
5a9e9f1 Revert "add b.txt"
4e61ca5 (origin/main, origin/HEAD) add c.txt
3bd328a add b.txt
be0d36b add a.txt
205a70c Initial commit

$ ls -l
total 8
-rw-r--r--@ 1 ask  staff  17  3 14 10:12 README.md
-rw-r--r--@ 1 ask  staff   0  3 14 11:34 a.txt
-rw-r--r--@ 1 ask  staff   0  3 14 11:00 b.txt
-rw-r--r--@ 1 ask  staff   0  3 14 11:34 c.txt
git push 를 해서 원격 저장소에 저장한 다음 merge commit 을 만드는 작업을 한다.
$ git push

$ git switch -c merge_branch
$ touch d.txt
$ git add -A
$ git commit -m "add d.txt"

$ git push --set-upstream origin merge_branch
github 에서 pr 을 올리고 main branch 로 merge 한다.
이후에 main branch 에서 pull 한 다음에 커밋 로그를 보면 다음과 같다.
$ git switch main

$ git pull

$ ls -l
total 8
-rw-r--r--@ 1 ask  staff  17  3 14 10:12 README.md
-rw-r--r--@ 1 ask  staff   0  3 14 11:34 a.txt
-rw-r--r--@ 1 ask  staff   0  3 14 11:00 b.txt
-rw-r--r--@ 1 ask  staff   0  3 14 11:34 c.txt
-rw-r--r--@ 1 ask  staff   0  3 14 11:44 d.txt

$ git log
commit 409bf49c1b05a39609207da03f28f782c3b8a0b9 (HEAD -> main, origin/main, origin/HEAD)
Merge: d2b2258 9fdd01f
Author: Seungkyu Ahn <seungkyua@gmail.com>
Date:   Thu Mar 14 11:42:42 2024 +0900

    Merge pull request #1 from seungkyua/merge_branch

    add d.txt

commit 9fdd01fb9b0eff870093f15e246c998ae1fac452 (origin/merge_branch, merge_branch)
Author: Seungkyu Ahn <seungkyua@gmail.com>
Date:   Thu Mar 14 11:40:46 2024 +0900

    add d.txt

commit d2b22584cb8108cd7bc1eaaaa5775e1f19f330fa
Author: Seungkyu Ahn <seungkyua@gmail.com>
Date:   Thu Mar 14 11:00:28 2024 +0900

    Revert "Revert "add b.txt""

    This reverts commit 5a9e9f14b9b7403ad5aef1df83d14f1a1d4938dd.
첫번째 커밋 로그를 보면 Merge: d2b2258 9fdd01f 와 같이 Merge 임을 알 수 있다. merge 의 경우 revert 는 -m 옵션으로 첫번재 hash 값을 적용할지 두번째 hash 값을 적용할지를 결정해 주어야 한다.
merge 바로 이전 커밋인 d2b2258 으로 revert 할 것이기 때문에 첫번재를 선택해 준다.
$ git revert 409bf49c -m 1

[main d53c40d] Revert "Merge pull request #1 from seungkyua/merge_branch"
 1 file changed, 0 insertions(+), 0 deletions(-)
 delete mode 100644 d.txt
로그를 보면 revert 되었음을 알 수 있다.
$ git log --oneline -n 20

d53c40d (HEAD -> main) Revert "Merge pull request #1 from seungkyua/merge_branch"
409bf49 (origin/main, origin/HEAD) Merge pull request #1 from seungkyua/merge_branch
9fdd01f (origin/merge_branch, merge_branch) add d.txt
d2b2258 Revert "Revert "add b.txt""
5a9e9f1 Revert "add b.txt"
4e61ca5 add c.txt
3bd328a add b.txt
be0d36b add a.txt
205a70c Initial commit
$ ls -l
total 8
-rw-r--r--@ 1 ask staff 17 3 14 10:12 README.md
-rw-r--r--@ 1 ask staff 0 3 14 11:34 a.txt
-rw-r--r--@ 1 ask staff 0 3 14 11:00 b.txt
-rw-r--r--@ 1 ask staff 0 3 14 11:34 c.txtcommit 에 대한 패치 파일을 만들고 -R 옵션을 사용하여 패치 파일을 apply 하면 해당 패치 파일에 대한 commit 을 삭제할 수 있다.
현재 커밋 로그는 다음과 같다.
$ git log --oneline -n 20

d53c40d (HEAD -> main, origin/main, origin/HEAD) Revert "Merge pull request #1 from seungkyua/merge_branch"
409bf49 Merge pull request #1 from seungkyua/merge_branch
9fdd01f (origin/merge_branch, merge_branch) add d.txt
d2b2258 Revert "Revert "add b.txt""
5a9e9f1 Revert "add b.txt"
4e61ca5 add c.txt
3bd328a add b.txt
be0d36b add a.txt
205a70c Initial commit
$ ls -l
total 8
-rw-r--r--@ 1 ask staff 17 3 14 10:12 README.md
-rw-r--r--@ 1 ask staff 0 3 14 11:34 a.txt
-rw-r--r--@ 1 ask staff 0 3 14 11:00 b.txt
-rw-r--r--@ 1 ask staff 0 3 14 11:34 c.txt여기서 3bd328a add b.txt 에 대한 패치 파일을 만들어 보자.
$ git format-patch -1 3bd328a아래와 같이 하나의 0001-add-b.txt.patch 패치 파일이 생성되었다.
$ ls -l
total 16
-rw-r--r--@ 1 ask  staff  368  3 14 13:46 0001-add-b.txt.patch
-rw-r--r--@ 1 ask  staff   17  3 14 10:12 README.md
-rw-r--r--@ 1 ask  staff    0  3 14 11:34 a.txt
-rw-r--r--@ 1 ask  staff    0  3 14 11:00 b.txt
-rw-r--r--@ 1 ask  staff    0  3 14 11:34 c.txt
이제 -R 옵션을 적용하여 patch 파일을 적용하자. -R 옵션은 reverse 로 패치 파일을 삭제하는 역할을 한다.
$ git apply -R 0001-add-b.txt.patch상태를 보면 다음과 같다.
$ git status
On branch main
Your branch is up to date with 'origin/main'.

Changes not staged for commit:
  (use "git add/rm <file>..." to update what will be committed)
  (use "git restore <file>..." to discard changes in working directory)
    deleted:    b.txt

Untracked files:
  (use "git add <file>..." to include in what will be committed)
    0001-add-b.txt.patch

no changes added to commit (use "git add" and/or "git commit -a")
파일 리스트를 보면 b.txt 가 삭제되어 있다.
$ ls -l
total 16
-rw-r--r--@ 1 ask  staff  368  3 14 13:46 0001-add-b.txt.patch
-rw-r--r--@ 1 ask  staff   17  3 14 10:12 README.md
-rw-r--r--@ 1 ask  staff    0  3 14 11:34 a.txt
-rw-r--r--@ 1 ask  staff    0  3 14 11:34 c.txt
이제 삭제된 파일을 stage 에 add 한 후 commit 한다.
$ git add b.txt
$ git commit -m "-R patch to b.txt"
커밋 로그를 보면 b.txt 가 삭제된 것을 알 수 있다.
$ git log --oneline -n 20

44e55ce (HEAD -> main) -R patch to b.txt
d53c40d (origin/main, origin/HEAD) Revert "Merge pull request #1 from seungkyua/merge_branch"
409bf49 Merge pull request #1 from seungkyua/merge_branch
9fdd01f (origin/merge_branch, merge_branch) add d.txt
d2b2258 Revert "Revert "add b.txt""
5a9e9f1 Revert "add b.txt"
4e61ca5 add c.txt
3bd328a add b.txt
be0d36b add a.txt
205a70c Initial commit
패치 파일이 있으니 apply 로 해당 commit 을 다시 살려보자. 실제로는 commit 을 살리는 것이 아니라 해당 commit 의 변경된 파일을 되살리는 것이다.
$ git apply 0001-add-b.txt.patch
$ git add b.txt
$ git commit -m "restore b.txt using patch"
아래 디렉토리에 b.txt 가 살아난 것을 알 수 있다.
$ ls -l
total 16
-rw-r--r--@ 1 ask  staff  368  3 14 13:46 0001-add-b.txt.patch
-rw-r--r--@ 1 ask  staff   17  3 14 10:12 README.md
-rw-r--r--@ 1 ask  staff    0  3 14 11:34 a.txt
-rw-r--r--@ 1 ask  staff    0  3 14 14:03 b.txt
-rw-r--r--@ 1 ask  staff    0  3 14 11:34 c.txt
필요없는 패치 파일은 삭제한다.
$ rm 0001-add-b.txt.patch현재 커밋 로그는 아래와 같다.
$ git log --oneline -n 20

9aced43 (HEAD -> main, origin/main, origin/HEAD) restore b.txt using patch
44e55ce -R patch to b.txt
d53c40d Revert "Merge pull request #1 from seungkyua/merge_branch"
409bf49 Merge pull request #1 from seungkyua/merge_branch
9fdd01f (origin/merge_branch, merge_branch) add d.txt
d2b2258 Revert "Revert "add b.txt""
5a9e9f1 Revert "add b.txt"
4e61ca5 add c.txt
3bd328a add b.txt
be0d36b add a.txt
205a70c Initial commit
여기서 be0d36b add a.txt , 3bd328a add b.txt, 4e61ca5 add c.txt 을 하나의 패치 파일로 만들고 싶으면 다음과 같이 하면 된다.
시작 hash값 ^.. 종료 hash값
만약 .. 만 사용하면 시간 hash값은 포함되지 않는다(여기서는 be0d36b add a.txt 커밋이 포함되지 않는다). 그러므로 시작 hash값을 포함하고 싶으면 ^.. 을 사용해야 한다.
$ git format-patch be0d36b^..4e61ca5 --stdout > commits.patch한가지 더 설명하자면 format-patch 는 커밋 히스토리까지 파일에 포함 시킨다. diff 를 사용하면 커밋 히스토리를 제외할 수 있다.
$ git diff be0d36b^..4e61ca5 > diff.patchhelm chart 를 만들기 위해서는 여러 기능들을 알아야 하지만 그 중에서 가장 많이 쓰고 헷갈리는 기능에 대해서 살펴 본다.
기본적으로 실습할 수 있는 환경을 먼저 만들고 하나씩 공부해 본다.
$ helm create flow-control
$ cd flow-control
yaml 형태의 출력을 확인해 본다.
$ helm template .
---
# Source: flow-control/templates/serviceaccount.yaml
apiVersion: v1
kind: ServiceAccount
metadata:
  name: release-name-flow-control
  labels:
    helm.sh/chart: flow-control-0.1.0
    app.kubernetes.io/name: flow-control
    app.kubernetes.io/instance: release-name
    app.kubernetes.io/version: "1.16.0"
    app.kubernetes.io/managed-by: Helm
automountServiceAccountToken: true
---
# Source: flow-control/templates/service.yaml
apiVersion: v1
kind: Service
metadata:
  name: release-name-flow-control
  labels:
    helm.sh/chart: flow-control-0.1.0
    app.kubernetes.io/name: flow-control
    app.kubernetes.io/instance: release-name
    app.kubernetes.io/version: "1.16.0"
    app.kubernetes.io/managed-by: Helm
spec:
  type: ClusterIP
  ports:
    - port: 80
      targetPort: http
      protocol: TCP
      name: http
  selector:
    app.kubernetes.io/name: flow-control
    app.kubernetes.io/instance: release-name
---
# Source: flow-control/templates/deployment.yaml
apiVersion: apps/v1
kind: Deployment
metadata:
  name: release-name-flow-control
  labels:
    helm.sh/chart: flow-control-0.1.0
    app.kubernetes.io/name: flow-control
    app.kubernetes.io/instance: release-name
    app.kubernetes.io/version: "1.16.0"
    app.kubernetes.io/managed-by: Helm
spec:
  replicas: 1
  selector:
    matchLabels:
      app.kubernetes.io/name: flow-control
      app.kubernetes.io/instance: release-name
  template:
    metadata:
      labels:
        helm.sh/chart: flow-control-0.1.0
        app.kubernetes.io/name: flow-control
        app.kubernetes.io/instance: release-name
        app.kubernetes.io/version: "1.16.0"
        app.kubernetes.io/managed-by: Helm
    spec:
      serviceAccountName: release-name-flow-control
      securityContext:
        {}
      containers:
        - name: flow-control
          securityContext:
            {}
          image: "nginx:1.16.0"
          imagePullPolicy: IfNotPresent
          ports:
            - name: http
              containerPort: 80
              protocol: TCP
          livenessProbe:
            httpGet:
              path: /
              port: http
          readinessProbe:
            httpGet:
              path: /
              port: http
          resources:
            {}
---
# Source: flow-control/templates/tests/test-connection.yaml
apiVersion: v1
kind: Pod
metadata:
  name: "release-name-flow-control-test-connection"
  labels:
    helm.sh/chart: flow-control-0.1.0
    app.kubernetes.io/name: flow-control
    app.kubernetes.io/instance: release-name
    app.kubernetes.io/version: "1.16.0"
    app.kubernetes.io/managed-by: Helm
  annotations:
    "helm.sh/hook": test
spec:
  containers:
    - name: wget
      image: busybox
      command: ['wget']
      args: ['release-name-flow-control:80']
  restartPolicy: Never
제대로 출력된다면 필요없는 파일은 삭제하고 초기화 하자.
$ rm -rf template/*
$ cat /dev/null > values.yaml가장 간단한 configmap 을 만들어서 value 값을 출력한다.
$ values.yaml
---
favorite:
  drink: coffee
  food: pizza

$ vi template/configmap.yaml
apiVersion: v1
kind: ConfigMap
metadata:
  name: {{ .Release.Name }}-configmap
data:
  myvalue: "Hello World"
  drink: {{ .Values.favorite.drink | default "tea" | quote }}
  food: {{ .Values.favorite.food | upper | quote }}
  {{ if eq .Values.favorite.drink "coffee" }}
    mug: "true"
  {{ end }}

$ helm template .
--- output ---
Error: YAML parse error on flow-control/templates/configmap.yaml: error converting YAML to JSON: yaml: line 8: did not find expected key

Use --debug flag to render out invalid YAML
template 을 제너레이션하면 에러가 발생한다. 왜 그럴까?
configmap.yaml 에 mug: "true" 가 2칸 들여써 있어서 발생하는 에러이다. 이런 에러를 조심하면서 아래 실습을 해보자.
configmap.yaml 을 수정해서 제대로 yaml 을 생성해 보자.
$ vi template/configmap.yaml
apiVersion: v1
kind: ConfigMap
metadata:
  name: {{ .Release.Name }}-configmap
data:
  myvalue: "Hello World"
  drink: {{ .Values.favorite.drink | default "tea" | quote }}
  food: {{ .Values.favorite.food | upper | quote }}
  {{ if eq .Values.favorite.drink "coffee" }}
  mug: "true"
  {{ end }}

$ helm template .
---
# Source: flow-control/templates/configmap.yaml
apiVersion: v1
kind: ConfigMap
metadata:
  name: release-name-configmap
data:
  myvalue: "Hello World"
  drink: "coffee"
  food: "PIZZA"
                    --------------> 빈라인 발생한다.
  mug: "true"
                    --------------> 빈라인 발생한다.
.Release.Name 은 helm 으로 설치할 때 파라미터로 넘기는 값인데 여기서는 설치가 아니므로 기본 값인 release-name 으로 치환 되었고, .Values.favorite.drink 는 values.yaml 에 지정한 키값으로 그에 해당하는 밸류 값이 제너레이트 될 때 출력된다.
함수의 연속적 사용은 | 라인으로 호출 가능하며 default 는 키에 대한 값이 없을 때, quote 는 값을 " 으로 묶을 때 upper 는 값을 대문자로 변환할 때 사용하는 내장 함수이다.
비교 구문은 if eq 값1 값2 와 같이 사용할 수 있다.
출력하지 않는 곳에서는 빈라인이 발생하는데 이 부분을 다음과 같이 없애 줄 수 있다.
{{ if eq .Values.favorite.drink "coffee" }}mug: "true"{{ end }}하지만 가독성이 떨어지므로 {{- 와 같이 표현하면 빈라인이 없어지면서 윗라인에 나란히 붙는 것과 같은 효과를 낼 수 있다.
  {{- if eq .Values.favorite.drink "coffee" }}
  mug: "true"
  {{- end }}
다시 yaml 을 생성해 보면 아래와 같이 빈라인이 없어졌음을 알 수 있다.
$ helm template .
---
# Source: flow-control/templates/configmap.yaml
apiVersion: v1
kind: ConfigMap
metadata:
  name: release-name-configmap
data:
  myvalue: "Hello World"
  drink: "coffee"
  food: "PIZZA"
  mug: "true"
조건문 대신 다음과 같이 with 를 사용하여 조건문과 키밸류 스쿱을 지정할 수 있다.
### configmap.yaml
apiVersion: v1
kind: ConfigMap
metadata:
  name: {{ .Release.Name }}-configmap
data:
  myvalue: "Hello World"
  {{- with .Values.hobby }}
  sports: {{ .sports }}
  {{- end }}

### values.yaml
hobby:
  sports: golf
with 와 함께 사용한 키는 해당 키에 대한 값이 있을 때만 with ~ end 로 감싼 구문이 출력된다. 또한 감싼 구문 안에서는 스쿱이 재정의되어 hobby 아래의 키인 sports 를 .sports 로 바로 사용할 수 있다.
yaml 을 생성하면 다음과 같은 결과가 나온다.
$ helm template .

# Source: flow-control/templates/configmap.yaml
apiVersion: v1
kind: ConfigMap
metadata:
  name: release-name-configmap
data:
  myvalue: "Hello World"
  sports: golf
만약 values 에 sports 를 없애면 아래와 같이 출력되지 않는다.
### values.yaml
hobby: {}

# Source: flow-control/templates/configmap.yaml
apiVersion: v1
kind: ConfigMap
metadata:
  name: release-name-configmap
data:
  myvalue: "Hello World"
hobby 아래의 키는 키밸류인 디셔너리 타입을 넣기 때문에 아래의 값을 모두 없애기 위해서{} 빈 딕셔너리 값으로 지정했다. 만약 아래의 값이 리스트라면 [] 와 같이 빈 리스트 값을 지정할 수 있다.
with ~ end 로 감싼 구문에서 root 영역의 value 를 활용하고 싶을 수 있다. 이 때는 $ 를 붙혀서 영역을 최상위 root 로 접근할 수 있다. 아래 예제에서 $.Release.Name 을 참고한다.
### configmap.yaml
apiVersion: v1
kind: ConfigMap
metadata:
  name: {{ .Release.Name }}-configmap
data:
  myvalue: "Hello World"
  {{- with .Values.hobby }}
  sports: {{ .sports }}
  release: {{ $.Release.Name }}
  {{- end }}
YAML 은 JSON 의 수퍼셋이기 때문에 JSON 으로 표현하여 가독성을 높혀줄 수 도 있다. pod 를 만들 때 yaml 에 args 를 추가할 수 있는데. 이 때 JSON 을 쓰면 읽기에 편하다.
args:
  - "--dirname"
  - "/foo"
위의 내용은 JSON 으로 아래와 같이 바꿀 수 있다.
args: ["--dirname", "/foo"]range 를 이용하여 반복문을 사용할 수 있다.
### values.yaml
pizzaToppings:
  - mushrooms
  - cheese
  - peppers
  - onions

### configmap.yaml
apiVersion: v1
kind: ConfigMap
metadata:
  name: {{ .Release.Name }}-configmap
data:
  toppings: |-
    {{- range .Values.pizzaToppings }}
    - {{ . | title | quote }}
    {{- end }}
pizzaToppings 의 값은 리스트이다(- 기호가 값으로 붙었기 때문에 리스트임을 알 수 있다). 리스트로 값을 가져와서 출력하기 때문에 아래와 같은 결과가 나온다.
# Source: flow-control/templates/configmap.yaml
apiVersion: v1
kind: ConfigMap
metadata:
  name: release-name-configmap
data:
  toppings: |-
    - "Mushrooms"
    - "Cheese"
    - "Peppers"
    - "Onions"
한가지 yaml 에서 toppings: 의 뒤에 따라온 |- 기호의 의미는 멀티 라인 스트링을 받겠다는 의미이다.
tuple 을 사용하여 튜플로 만들어 쓸 수 도 있다.
### configmap.yaml
apiVersion: v1
kind: ConfigMap
metadata:
  name: {{ .Release.Name }}-configmap
data:
  sizes: |-
    {{- range tuple "small" "medium" "large" }}
    - {{ . }}
    {{- end }}

### 출력 결과
# Source: flow-control/templates/configmap.yaml
apiVersion: v1
kind: ConfigMap
metadata:
  name: release-name-configmap
data:
  sizes: |-
    - small
    - medium
    - large
$ 와 := 를 이용하여 변수를 지정할 수 있다. 아래는 리스트에서 받은 값을 index 변수와 value 변수로 받아서 활용하는 부분이다.
### values.yaml
pizzaToppings:
  - mushrooms
  - cheese
  - peppers
  - onions

### configmap.yaml
apiVersion: v1
kind: ConfigMap
metadata:
  name: {{ .Release.Name }}-configmap
data:
  toppings: |-
    {{- range $index, $value := .Values.pizzaToppings }}
    - {{ $index }}: {{ $value }}
    {{- end }}

# Source: flow-control/templates/configmap.yaml
apiVersion: v1
kind: ConfigMap
metadata:
  name: release-name-configmap
data:
  toppings: |-
    - 0: mushrooms
    - 1: cheese
    - 2: peppers
    - 3: onions
map 값을 변수로 받아 처리할 수 도 있다.
### values.yaml
favorite:
  drink: coffee
  food: pizza

### configmap.yaml
apiVersion: v1
kind: ConfigMap
metadata:
  name: {{ .Release.Name }}-configmap
data:
  favorite: |-
    {{- range $key, $value := .Values.favorite }}
    {{ $key }}: {{ $value }}
    {{- end }}

# Source: flow-control/templates/configmap.yaml
apiVersion: v1
kind: ConfigMap
metadata:
  name: release-name-configmap
data:
  favorite: |-
    drink: coffee
food: pizza부분적으로 사용자 정의 template 을 만들어서 활용 할 수 있다.
template 은 define 으로 선언하고 tempate 으로 활용할 수 있다.
### configmap.yaml
{{- define "mychart.labels" }}
  labels:
    generator: helm
    date: {{ now | htmlDate }}
{{- end }}
apiVersion: v1
kind: ConfigMap
metadata:
  name: {{ .Release.Name }}-configmap
  {{- template "mychart.labels" }}
data:
  myvalue: "Hello World"

# Source: flow-control/templates/configmap.yaml
apiVersion: v1
kind: ConfigMap
metadata:
  name: release-name-configmap
  labels:
    generator: helm
    date: 2023-10-31
data:
  myvalue: "Hello World"
위의 예제는 labels 에 date: 날짜 를 추가로 넣는 부분을 named template 을 만들어서 사용한 예제이다.
chat 를 만들 때 configmap.yaml 과 같이 쿠버네티스 리소스들은 template 디렉토리 아래에 위치 시킨다고 했다. 이 디렉토리에 위치한 yaml 파일들은 자동으로 렌더링에 포함되는데 _ 로 시작하는 파일은 렌더링에서 제외한다. 그래서 보통 define 으로 정의한 함수들은 _helper.tpl 파일을 만들어서 이곳에 위치 시킨다.
define 으로 정의된 named template (함수) 은 template 으로 호출되기 전까지는 렌더링 되지 않는다. 이제 이 함수를 _helper.tpl 파일로 옮겨서 렌더링 결과를 살펴보자.
# _helper.tpl
{{- define "mychart.labels" }}
  labels:
    generator: helm
    date: {{ now | htmlDate }}
{{- end }}

# configmap.yaml
apiVersion: v1
kind: ConfigMap
metadata:
  name: {{ .Release.Name }}-configmap
  {{- template "mychart.labels" }}
data:
  myvalue: "Hello World"

# Source: flow-control/templates/configmap.yaml
apiVersion: v1
kind: ConfigMap
metadata:
  name: release-name-configmap
  labels:
    generator: helm
    date: 2023-10-31
data:
  myvalue: "Hello World"
위의 예제에서 define 함수 내에서 .Values 와 같이 value 를 가져오는 것은 하지 않았다. 아래와 같이 {{ .Chart.Name }} 을 사용한다면 위의 방식으로는 값을 표현할 수 없다.
# _helper.tpl
{{- define "mychart.labels" }}
  labels:
    generator: helm
    date: {{ now | htmlDate }}
    chart: {{ .Chart.Name }}
    version: {{ .Chart.Version }}
{{- end }}

# Source: flow-control/templates/configmap.yaml
apiVersion: v1
kind: ConfigMap
metadata:
  name: release-name-configmap
  labels:
    generator: helm
    date: 2023-10-31
    chart:
    version:
data:
  myvalue: "Hello World"
이는 template 으로 호출할 때 뒤에 value 를 보내지 않아서 발생한 부분이다. 즉 {{- template "mychart.labels" . }} 과 같이 마지막에 현재의 scope value 인 . 을 넘겨 주어야 제대로 된 값이 출력된다.
# configmap.yaml
apiVersion: v1
kind: ConfigMap
metadata:
  name: {{ .Release.Name }}-configmap
  {{- template "mychart.labels" . }}
data:
  myvalue: "Hello World"

# Source: flow-control/templates/configmap.yaml
apiVersion: v1
kind: ConfigMap
metadata:
  name: release-name-configmap
  labels:
    generator: helm
    date: 2023-10-31
    chart: flow-control
version: 0.1.0template 은 있는 그대로 output 을 보여주기 때문에 들여쓰기의 문제가 있을 수 있다.
# _helper.tlp
{{- define "mychart.app" -}}
app_name: {{ .Chart.Name }}
app_version: "{{ .Chart.Version }}"
{{- end -}}

# configmap.yaml
apiVersion: v1
kind: ConfigMap
metadata:
  name: {{ .Release.Name }}-configmap
  labels:
    {{ template "mychart.app" . }}
data:
  myvalue: "Hello World"
{{ template "mychart.app" . }}

# Source: flow-control/templates/configmap.yaml
apiVersion: v1
kind: ConfigMap
metadata:
  name: release-name-configmap
  labels:
    app_name: flow-control
app_version: "0.1.0"
data:
  myvalue: "Hello World"
app_name: flow-control
app_version: "0.1.0"
app_name 과 app_version 이 출력된 것을 보면 define 에 정의된 들여쓰기 대로 그대로 출력되어 원하는 대로 출력되지 않는다.
include 와 nindent 를 사용하면 원하는 들여쓰기가 가능하다.
# configmap.yaml
apiVersion: v1
kind: ConfigMap
metadata:
  name: {{ .Release.Name }}-configmap
  labels:
    {{ template "mychart.app" . }}
data:
  myvalue: "Hello World"
{{ template "mychart.app" . }}

# Source: flow-control/templates/configmap.yaml
apiVersion: v1
kind: ConfigMap
metadata:
  name: release-name-configmap
  labels:
    app_name: flow-control
    app_version: "0.1.0"
data:
  myvalue: "Hello World"
  app_name: flow-control
  app_version: "0.1.0"
끝으로 helm install 할 때 들여쓰기가 잘못되면 렌더링 오류가 나서 최종 결과를 볼 수 가 없다. 이를 해결할 수 있는 옵션이 -disable-openapi-validation 이다.
$ helm install --dry-run --disable-openapi-validation mychart ./
 Seungkyu Ahn's Blog, Kubernetes, Container, CNCF, OpenStack, Linux, Programming and so on by seungkyua@gmail.com |
||


|

